
Imagine losing your crypto because your laptop got hacked. Not because you clicked a bad link, but because your private keys were sitting on an internet-connected device. That’s the exact problem hardware wallets solve. When you connect a hardware wallet like Ledger or Trezor to MetaMask, you keep your keys offline-safe from remote attacks-while still using MetaMask’s familiar interface to send, receive, and interact with dApps. It’s not magic. It’s smart security.
Why This Setup Matters
In 2020, 12% of cryptocurrency users experienced theft attempts, according to Chainalysis. Most of those happened because private keys were stored on phones or computers that were always online. MetaMask, launched in 2016, started as a simple browser extension. But as crypto grew, so did the risks. By 2018, after the Coincheck hack that lost $530 million, MetaMask added hardware wallet support to give users a way to protect their assets without giving up convenience. Today, over 14 million MetaMask users connect hardware wallets. That’s nearly 39% of all active users. And it’s not just individuals-67 Fortune 500 companies now use this setup for their blockchain operations. Why? Because it works. Your keys never leave the device. Even if your computer gets infected, your crypto stays safe.How It Actually Works
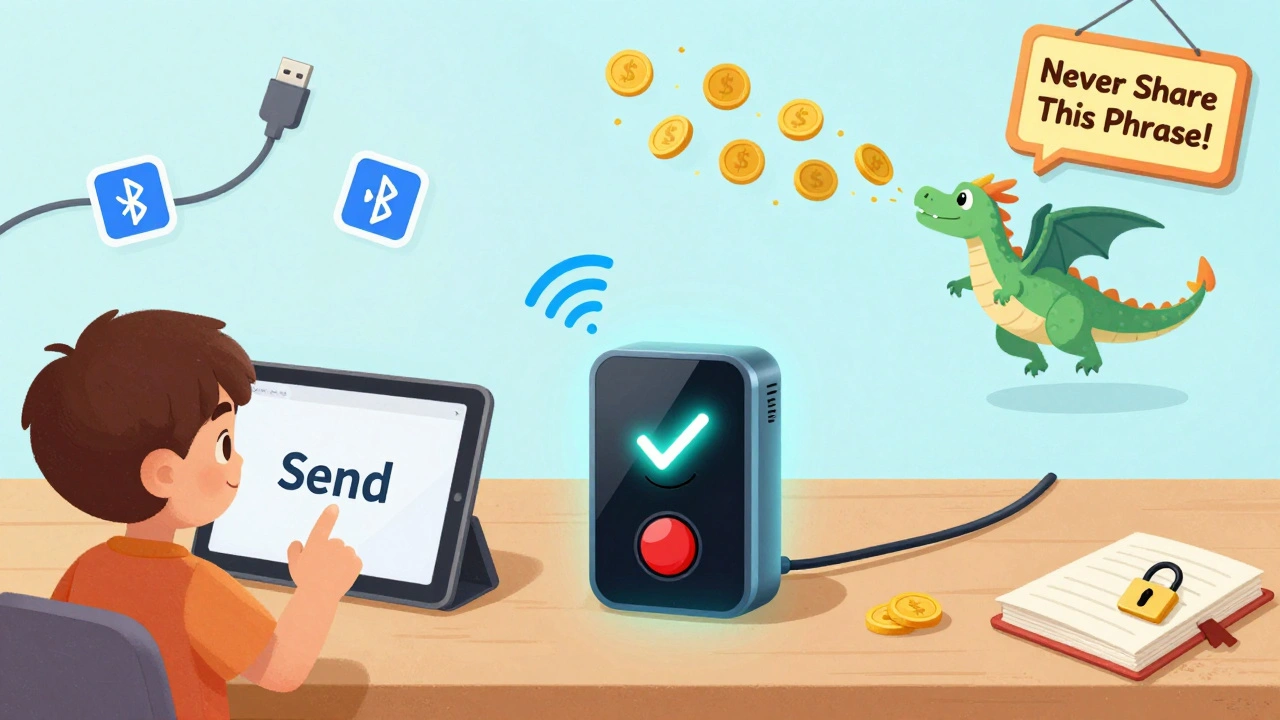
Here’s the real trick: your private keys never touch your computer. When you sign a transaction, MetaMask sends the request to your hardware wallet. You physically confirm it on the device’s screen-pressing buttons, checking amounts, verifying addresses. Only then does the signed transaction go back to MetaMask and onto the blockchain. This isn’t just theory. It’s built into the protocol:- You click "Send" in MetaMask on your browser.
- MetaMask sends the transaction data to your hardware wallet via USB or Bluetooth.
- You verify the details on your Ledger or Trezor screen and approve it with a button press.
- The hardware wallet signs the transaction using its internal secure chip.
- The signed transaction is sent back to MetaMask.
- MetaMask broadcasts it to the network.
Which Hardware Wallets Work
MetaMask supports several major brands, but not all work the same way:| Device | Connection Type | Security Feature | Mobile Support | Success Rate |
|---|---|---|---|---|
| Ledger Nano S/X/XS | USB, Bluetooth | CC EAL5+ Secure Element | Yes | 98.7% (USB), 87.3% (Bluetooth) |
| Trezor Model T | USB only | Open-source firmware | No | 96.4% |
| OneKey Pro | USB, QR codes | Dual-chip architecture | Yes (via QR) | 100% (air-gapped) |
| Keystone | USB, QR | Air-gapped + OLED screen | Yes | 99.1% |
Setting It Up: The Safe Way
There’s one mistake that ruins everything: importing your MetaMask seed phrase into the hardware wallet. Don’t do it. Ever. Here’s the correct, secure workflow:- Power on your hardware wallet and set up a new Secret Recovery Phrase. Write it down. Store it offline.
- Open MetaMask and go to Settings → Accounts → Add Account or Hardware Wallet.
- Select your device type (Ledger, Trezor, etc.).
- MetaMask will scan and show you the first few addresses from your hardware wallet.
- Click "Import" to add those accounts to MetaMask.
- Transfer your crypto from your old MetaMask wallet to the new hardware wallet addresses.
Common Problems and Fixes
Even with the right setup, things can go wrong. Here’s what users actually run into:- "Device not recognized" - Most common with Ledger on Windows. Fix: Install Ledger’s udev rules. On Linux, run
sudo apt install libudev-devand restart. - "Bluetooth won’t pair" - Try turning off other Bluetooth devices. Reboot your phone. Update Ledger Live to version 2.45.1 or newer.
- "Transaction timed out" - Your hardware wallet screen went to sleep. Keep it awake during signing. On Trezor, disable auto-lock.
- "I can’t see my tokens" - You’re using the wrong derivation path. MetaMask uses m/44'/60'/0'/0 for Ledger. If you’re using a different wallet app, it might use a different path. Use the "Add Token" feature in MetaMask to manually add your ERC-20 tokens.
- "Passphrase entry failed" - Trezor users often forget to enter their passphrase on both the device AND in MetaMask. Type it twice. Exactly the same.

What’s Coming Next
MetaMask’s roadmap includes multi-hardware wallet support in Q2 2024. Right now, you can only connect one at a time. Soon, you’ll be able to manage Ledger, Trezor, and OneKey from the same MetaMask interface. Ledger is also dropping Ledger Live as a requirement. Their next firmware update will let you connect directly to MetaMask-no extra app needed. That’s a big usability win. The Ethereum Foundation just funded $1.2 million to improve transaction verification on hardware wallets. Right now, you’re trusting the device to show you the right amount and recipient. But if the screen is tampered with-or if you’re not paying attention-you could still sign something bad. New features will show transaction details in multiple ways (on-device + MetaMask) to reduce human error.Is This Enough?
No. Hardware wallets aren’t foolproof. In November 2023, someone had $1.2 million stolen because a thief broke into their home and physically stole their Ledger device. The device was unlocked and connected to a computer. The attacker didn’t hack the network-they just walked away with the keys. That’s why physical security matters too. Store your hardware wallet in a safe. Use a passphrase. Never leave it plugged in overnight. Don’t store your recovery phrase near the device. Connecting a hardware wallet to MetaMask doesn’t make you invincible. But it makes you 10x safer than 95% of crypto users. It’s the difference between keeping cash in your wallet versus a bank vault. You still need to lock the vault. But now, you’ve got the vault.Final Checklist
Before you start, make sure you’ve done this:- Updated MetaMask to version 10.24.1 or higher
- Updated your hardware wallet firmware (Ledger 2.0+, Trezor 2.4.2+, OneKey 3.1.0+)
- Created a new seed phrase on the hardware wallet-never imported from MetaMask
- Installed necessary drivers (especially on Linux/Windows)
- Enabled "blind signing" on Ledger for token transactions
- Transferred all assets to the new hardware wallet addresses
- Stored your recovery phrase in a fireproof, waterproof, offline location
Can I connect multiple hardware wallets to MetaMask at once?
No, not yet. MetaMask currently only allows one hardware wallet account to be connected at a time. But support for multiple hardware wallets is coming in Q2 2024. Until then, you can switch between devices by disconnecting one and connecting another. Each wallet will show its own set of addresses.
Do I need to install Ledger Live or Trezor Suite to use them with MetaMask?
For Ledger, yes-currently you need Ledger Live to install the Ethereum app and manage firmware. Trezor doesn’t require Trezor Suite for basic connection, but you’ll still need to update firmware through their website. Both will eventually allow direct MetaMask connection without extra apps, but that’s still rolling out in 2024.
What if I lose my hardware wallet?
If you’ve set up a new seed phrase on the device (and didn’t import from MetaMask), you can buy a new hardware wallet-any brand-and restore your funds using that 12- or 24-word recovery phrase. Your crypto isn’t tied to the device. It’s tied to the seed phrase. That’s why storing it securely is more important than the device itself.
Is Bluetooth safe for connecting my hardware wallet?
Bluetooth is safe for this use case because the hardware wallet never transmits your private keys. It only sends signed transactions. The connection is encrypted and requires physical button confirmation on the device. But Bluetooth has lower reliability than USB. If you’re sending large amounts, use USB. For small daily transactions, Bluetooth is fine.
Can I use MetaMask Mobile with a hardware wallet?
Yes-but only with specific devices. Keystone, Ledger Nano X, OneKey, and AirGap Vault support MetaMask Mobile via Bluetooth or QR codes. Trezor and Ledger Nano S do not work with the mobile app. Always check the official MetaMask hardware wallet compatibility list before buying a device for mobile use.
Why does MetaMask show different addresses than my hardware wallet’s native app?
MetaMask uses a fixed derivation path (m/44'/60'/0'/0) for all hardware wallets. But some native apps (like Ledger Live or Trezor Suite) may use different paths, like m/44'/60'/0'/0/0 or m/44'/60'/0'/0/x. That’s why you might see different addresses. Always use the addresses shown in MetaMask when sending funds to your hardware wallet. If you need to access funds from the native app, you’ll need to manually change the derivation path in that app’s settings.